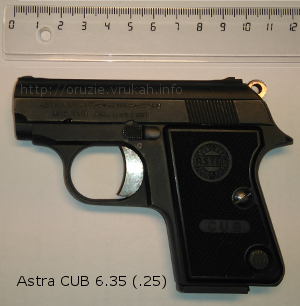
The Astra «Cub». Model 2000, utilizing caliber .22 Short and 6.35mm (.25) ammunition, was built with regard to the same principles, both mechanical and ballistic, on which the function of all models of Astra pistols is based. In its design this pistol was destined for use in plinking or personal defense. Inherent in this pistol are the best conditions for this utilization and, what is more, it is sturdy, perfectly adjusted and mechanically precise. This is characteristic of all the arms produced by Astra- Unceta у Compañía, S. A., which for 45 years has been dedicated exclusively to the manufacture of firearms which are universally accepted. This guarantees the perfection of the «Cub» pistol, since it assures that past experiences were fully referred to before the pistol was placed on sale.
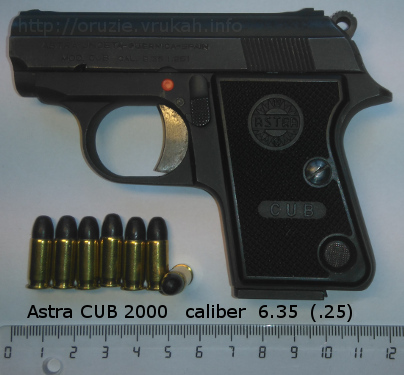
The Astra «Cub» is a firearm of semi-automatic type with magazine. It has an exterior hammer, by which the pistol can be easily cocked with a simple motion of the thumb. The total weight of the pistol is carefully distributed to assure perfect balance, and the shape of the grip and the position of the trigger both contribute to natural «pointing» and ease in firing.
Safety features
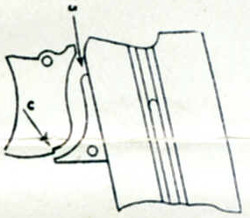
1. The pistol is provided with a thumb safety (Figure 1) so located that it is easily reached by the thumb when the pistol is held in the right hand, making it simple to change the safety lever from «safe» to «fire».
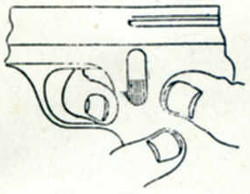
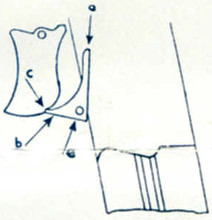
This safety acts on the trigger which remains locked to all movement when the body of the safety is opposed to the mass of the trigger, thus preventing movement of the trigger. When the thumb safety is turned to fire position (Figure 2) the safety bar no longer blocks the trigger, allowing movement of the trigger for firing (Figure 3).
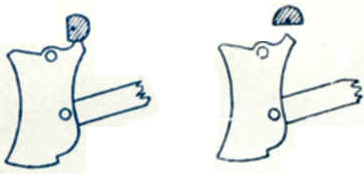
2. The pistol also has a magazine safety, which guarantees additional safety of the arm when a live round is in the chamber, thus permitting firing of the cartridge only when the magazine is replaced. In effect, (Figure 4), the magazine, when in place, maintains the piece «a» in such a position that no part of it obstructs the trigger. However, when the magazine is removed (Figure 5), the piece «a», through the action of its self-contained spring, engages a notch in the trigger, thus preventing any movement of the trigger and discharge of the gun. Because of the contact between the sear and the hammer, the pistol, when loaded and with the hammer cocked, cannot be discharged involuntarily. The pistol in this way is secure and safe and even if the hammer accidentally releases while cocking there is little risk that the pistol will fire.
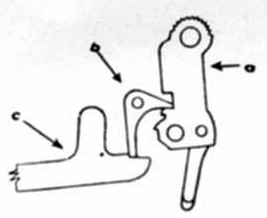
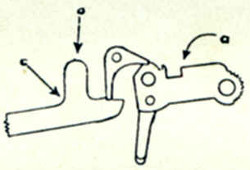
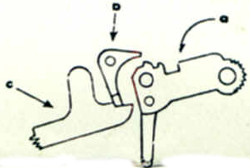
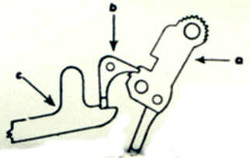
To fire the pistol it is necessary that the trigger actually be pulled, requiring voluntary action to do so. In effect, when the hammer is cocked (Figure 6), it is drawn back on its axis from position I to position II, at the same time, the sear, moving also on its axis, is displaced and comes to rest in the notches or teeth of the hammer. Once in position II the hammer remains immovable, so placed that the point of the sear is engaged below the second tooth or notch of the hammer, thus impeding its advance. Only when the shooter, pressing on the trigger, causes the trigger bar to bear against the sear, moving it to position III, the hammer is then launched forward against the firing pin. If, when the hammer is in the motion between position I and position II, it should slip from under the thumb of the shooter, it would come to rest on the first tooth against the sear (half cock notch), position IV, thereby rendering it safe.
Figures 6.1 to 6.4
a. Hammer
b. Sear
c. Trigger Bar
Operation of the pistol
In loading the magazine note that the magazine has a button with which it is possible to depress the elevator or magazine follower sufficiently to introduce cartridges more easily, since then the pressure of the magazine spring against the follower is reduced. Insert the magazine with its complement of cartridges in its place in the grip of the pistol and with the thumb safety in fire position move the slide fully to the rear, then releasing it so as to introduce the first cartridge from the magazine to the chamber. With this same motion the hammer is cocked and the arm is ready to fire. Holding the pistol carefully it is fired by pressing the trigger with the index finger. After each cartridge is fired, as long as the magazine contains cartridges, the pistol is automatically loaded and the hammer cocked. The extraction of the empty magazine after the last cartridge is fired can be realized by simply pressing the checkered button, found on the pistol at the lower right hand corner of the left grip. If, at any time, it is desired to extract the cartridge which is in the chamber, it is necessary to move the slide back with a rapid motion, such as when the arm is loaded. This movement should be with sufficient speed so as to cause the cartridge to be thrown out of the extraction port. Note: The perfect function of the arm, especially in automatics, depends finally on the quality of the cartridges being used, which should be sufficiently powerfull to move the slide with enough force to allow the recuperation for which it was designed. The factory, in test firing the «Cub» pistol, has used ammunition manufactured in the United States.Maintenance and care of the pistol
The causes which contribute to the corrosion and formation of fouling in the interior of the barrel in this type of arm have been practically eliminated in the use of modern ammunition of the non-corrosive type and with lubricated bullets. The continued use of unlubricated copper plated bullets eventually builds up fouling in the grooves of the barrel and also leads to possible jamming and misfiring and other malfunctioning of the pistol. In case the barrel has been fouled by use of improper ammunition the use of the brush, which is supplied with the pistol, and a good grade of solvent is recommended. Pistols should be carefully wiped periodically with a rag lightly moistened with a gun solvent or gun oil to remove all traces of fingerprints or other stains which may form the base for the corrosive action of chemical rust.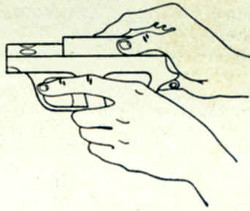
Disassembly & reassembly
To facilitate the cleaning and reoiling of the pistol Model 2000, the disassembly has been very much simplified as can be realized by the following instructions:
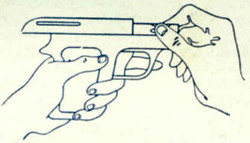
Remove the magazine and with the thumb safety in safe position draw back the slide, Figure 7. the hook on the thumb safety will engage a like notch on the side of the slide and hold the slide movable in this position. Then, holding the pistol in the left hand pointing towards the right, turn the barrel about one quarter turn to the right, at which time the barrel will be loosened from the frame and can be drawn forward. Then, give the barrel another quarter turn to the left, at which time it can be removed entirely from the slide, Figure 8. Then, by releasing the thumb safety the slide can be allowed to move forward and removed from the frame. Thus, the pistol is disassembled with a minimum number of parts to account for: Slide, barrel, recoil spring assembly, the frame and the magazine. With the pieces so separated it is possible to thoroughly clean the pistol without further disassembly.Total disassembly of the parts can be realized as follows:
Parts of the slide
- Removal of the retaining pin, located vertically on the high part of the slide to the rear and to the left of the loading port, release the firing pin and the firing pin spring.
- Removal of the headed retaining pin which is found in the interior on the underside of the slide directly behind the loading port permits simple separation of the extractor and the extractor spring.
Parts of the frame
- Remove first with the proper screw driver the screws which hold the grips to the frame, after which the grips can be very simply removed.
- The thumb safety is easily removed by placing it in a horizontal position to the rear, at which time the piece can be lifted from the frame.
- By removing the retaining pin for the magazine safety this piece can be easily removed, along with its spring.
- If you remove the trigger axis pin and raise the trigger bar it is possible to remove from the frame the trigger and trigger bar assembly simply by drawing it carefully to the rear.
- By inserting one or another of the axis pins in the small hole directly above and slightly to the rear of the grip screw hole on the left hand side of the frame, it is possible to retain the hammer spring, after which the hammer can be released by pressing on the sear.
- The hammer is then free of the tension of the hammer spring and the hammer axis pin can be easily removed, possibly with the use of another axis pin, at which time the hammer itself is easily separated from the frame.
- It is then a simple process to remove the axis pin which retains the sear, after which the sear and sear spring are also removed from the frame.
- Finally, the pin which has been inserted to provisionally retain the hammer spring can be removed, thus releasing the hammer spring and the hammer spring guide.
- Note that the magazine catch has a screw driver slot. It is necessary only to insert a screw driver and unscrew the catch. The catch and spring are then easily removed from the other side of the frame.
- Then the catch retaining plate is easily removed.
Technical data
Overall length 4 7/16"| Caliber | Overall length | Barrel length | Height | Weight without ammunition | Weight, without magazine | Magazine capacity |
|---|---|---|---|---|---|---|
| .22 short | 112 mm 4 4/10'' | 57 mm 2 1/4'' | 3 1/4'' | 350 g (12.35 oz.) | 11 oz. | 6 |
| 6.35 mm (.25) | 360 g (12.70 oz.) | 7 |
Cartridge velocities:
Standard speed 1045 ft.(318 m) per second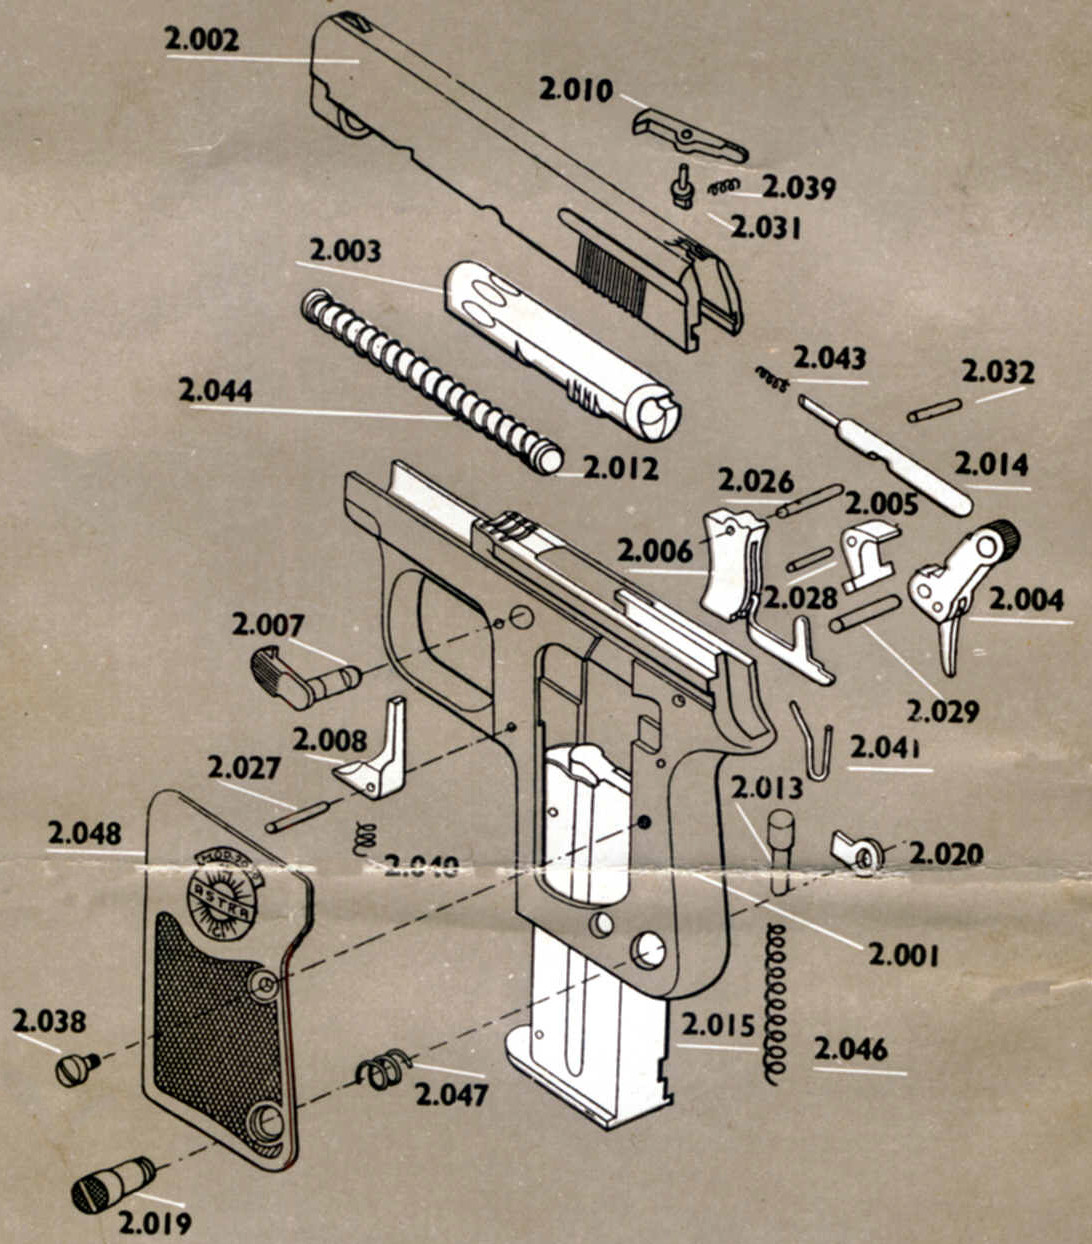
The Astra «Cub» parts
| The Astra «Cub» parts | |
|---|---|
| 2.001 Frame | 2.027 Magazine Safety Pin |
| 2.002 Slide | 2.028 Sear Pin |
| 2.003 Barrel | 2.029 Hammer Pin |
| 2.004 Hammer with Strut & Pin | 2.031 Extractor Pin |
| 2.005 Sear | 2.032 Firing Pin Retaining Pin |
| 2.006 Trigger with disconnector | 2.038 Grip Screw |
| 2.007 Thumb safety | 2.039 Extractor Spring |
| 2.008 Magazine safety | 2.040 Magazine Safety Spring |
| 2.010 Extractor | 2.041 Sear Spring |
| 2.013 Hammer Spring guide | 2.043 Firing Pin Spring |
| 2.014 Firing Pin | 2.044 Recoil Spring Assembly |
| 2.015 Magazine | 2.046 Hammer Spring |
| 2.019 Magazine Catch Button | 2.047 Magazine Catch Spring |
| 2.020 Magazine Catch | 2.048 Grip Plates |
| 2.026 Trigger Pin | |
GRIJELMO- GILBAO